Labels

Monday, January 14, 2013

Vanilla Bean Roundup


My best friend and I, we take our time. We walk slowly to our destinations, sip our tea, and exchange Christmas gifts weeks after the holiday has passed. We've done this every year since we've gotten close back in high school, and it suits us. A few days ago we followed through on this habit as usual and she gave me the best gift imaginable for a down and out foodie....whole Madagascar vanilla beans! Ever since, I've been fantasizing about what to do with them....so many possibilities! Vanilla beans are pricey, so I've long wanted to bake with them and never have. In fact, the only spice in the world more expensive is Saffron. As you can imagine, the options for use of this culinary gold are quite overwhelming. So I sifted through my favorite food blogs and came up with a list of finalists, so to speak. My only requirement was that the vanilla bean flavor be absolutely showcased. Here's the best of them (all credit given to the respective bloggers in links below the photos):

Vanilla Bean Whipped Cream

Recipe and photo from Barefeet In The Kitchen
The beauty of this is that you can glam up virtually anything with this vanilla infused addition. Just THINK of the possibilities! On cobbler, sweet potato pie, layered in parfait, or (dare I say it) with a spoon. Simple, delicious, and versatile.....what else could you want in a recipe?


Vanilla Bean Pound Cake

Photo and recipe from 80 Breakfasts
The best cake for flavor showcasing, in my opinion, is a pound cake. Its moist and mild, simple yet satisfying. This cake is all about the vanilla flavor, and I can't imagine how wonderfully guilty I would feel eating this for breakfast with some orange zest icing drizzled over the top. Unff.

Mini Vanilla Bean Scones 

Photo and recipe from Bourbonnatrix Bakes
These adorable scones were once found in Starbucks cafes, but were discontinued. This recipe recreates them in all of their vanilla glory. And don't be intimidated by how fancy "scones" sounds. They are deceptively simple to make.


Four-Cheese Vanilla Bean Cheesecake

Photo and recipe from Mississippi Kitchen

 "Four Cheese" is what honestly got my attention on this one. I have an addiction, but I am not ashamed. However, it still showcases vanilla beans as its primary flavor, which is all I am after here. Plus, what a gorgeous photo!

Vanilla Bean Ice Cream

Photo and recipe from The Pioneer Woman
This is obligatory in any vanilla related post, and for good reason. Even to chocolate devotees, vanilla bean ice cream cannot be denied its rich bold vanilla flavor. Besides, who said you can't just slap it on top of something chocolatey anyway? If it weren't so cold outside, I would have ALREADY made this one. Regardless, this recipe just had to be included, especially because it is from one of my favorite blogs.

How can I decide?? Any other vanilla-centered recipe suggestions are greatly welcomed!

Last Minute Thought!

Beans are pricey, so use every last part! Chope your bean in four pieces after using the inside pulp and seeds, then throw it in a cute jar with about a cup of sugar. Let it sit for a week or so, then enjoy the major flavor it adds to coffee, tea, or just about anything that requires sugar. For extra punch, grind up the dried bean pods with the sugar after letting it sit and then sift it to remove the chunks. In a cute jar with some ribbon it also makes a good hostess gift or just-because neighborly present. 

My jar obsession is actually useful sometimes.

Friday, January 4, 2013

Pining for Asia: Seaweed Egg Drop Soup

Cheesin' at the Great Wall of China
Last July I spent an entire month traveling China and Taiwan with my sister. My trip to Asia was an incredible, whirlwind experience that I can never recreate. However, what I can do my best to replicate is (arguably) the most exciting part of the trip; the food!

Now that I have completely outed myself as a foodie, I can freely describe some the meals I've been longing for since coming back home to Jersey. Among the top ten are stinky tofu, milk tea, hot pot (an incredible Asian rendition of fondu), and seaweed egg drop soup. More specifically, the seaweed egg drop soup we enjoyed while antiquing in downtown Beijing and which has haunted my dreams since August. Feast your eyes on this magical meal:


The magical soup in question is on the right.


It has the effect of comfort food, but with a beautiful array of Asian flavors that make me hungry just thinking about them. After discussing recently with my sister how much we both miss this particular dish, I decided to give it a try. Here's what I came up with as the closest match.

Note: do not be afraid of seaweed! This is a great introductory seaweed recipe for anyone tentative about the stuff. You can include as much or as little as you like: just adjust the salt and broth accordingly.

Ingredients: 

7 cups of broth (chicken or vegetable)

2 cups of water

A few good grinds of black pepper

Half teaspoon white pepper

One teaspoon of crushed red pepper

Half teaspoon ground ginger

Half of one large onion, diced

2 cups of dried seaweed, cut into long thin strips

3 eggs, beaten


Bring the broth and water to a boil in a large pot on high heat. I cheated and used bouillon cubes, but you can use whatever you want. Add all ingredients except for the eggs and reduce to medium heat. Stir constantly for one or two minutes. While pouring the eggs in SLOWLY, whisk the soup constantly. If you pour too quickly you'll wind up with big clumps of egg. Which is fine if that's what you want. I was going for authenticity so I wanted the thin strands like I originally experienced in Beijing. Be sure to taste the broth and adjust your spices to your preference! If you used less seaweed you may want to add a dash of sea salt. Leave on low heat for about 45 minutes to allow the onions to soften and all the wonderful flavors to meld. Then serve it up with some sesame crackers and green tea!

The end result with my failed photo skills:

A close second by comparison!


I'll always miss my trip to Asia, the amazing experiences I had, and the exotic foods I had the opportunity to try. But maybe, just maybe, with some more experimenting in my kitchen, I'll miss the food a little bit less!


Saturday, January 7, 2012

Autumn Blew The Quilt Right Off The Perfect Bed She Made.

First and foremost, allow it to be noted that the title of this entry is one of my favorite lines from one of my favorite songs by one of my favorite artists, Iron and Wine.

I'm obsessed with the passing of time, and the seasons, and  everything symbolic of either of the two. Which explains my love of that song and my love of the Fall. The colors coming to life around us are the ultimate symbol of change and the fleeting quality of life. And so I was ecstatic to see a picture of roses made of leaves on the interwebs somewhere. I took the idea, and my roommate, and rolled with it. Literally. We rode our bikes through the beautiful Stockton campus collecting leaves to make into roses for our Thanksgiving Day table centerpieces. The mess we brought into our apartment was completely worth the end results.

This picture is courtesy of my beautiful roommate Katie. I do believe it does the project visual justice.


 Essentially, all you have to do is gather leaves with points, fold down the points, and roll them up around each other with decreasing tension until it looks like a rose. Then wrap up the stems in something pretty. I chose yarn leftover from a coffee cup cozy I knitted myself.

The end result is nothing without a visual of the in-progress. Our other roommate had quite the surprise when she returned home from gaming club:

So. Many. Leaves. 

We also met a few nice bugs who got carried into our apartment among the leaves.


Aside from not having any actual vases in our apartment, I love bottles, and thought the Jack Daniels one gave it more of a rustic touch somehow. Despite that, my mother liked them enough when I brought them home to her to put them in our living room. Which is alot considering my mom's OCD tendencies when it comes to what comes and goes in her house.

The best part is, they've been there now for over 2 months, and though the leaves are dried and fragile, they've completely kept their shape. On our coffee table, they're a reminder of one of the best fall nights I ever had making them.

Maybe they look a little sad now. But I still think they're beautiful.

Here's a link to a DIY page better explaining how to do this. Though if you look at her flowers compared to mine, they look alot different. It all really depends on how tight you roll them in the center and how many leaves you use. Regardless, it explains the basics so you can try it and perfect your own technique. I hope you have as much fun as I did!

Tuesday, September 6, 2011

Where There's A Will There's A Whiskey

Bro Rule #867- There can ALWAYS be more burn.

You can totally mix a drink without disrupting its alcohol content. And if there is anyone whose word you should take on that it is a college student. In a recent quest for Fireball Whisky, to no avail, I came to the conclusion I usually arrive at- I can do it myself. Despite the interwebs having no directions whatsoever for making your own, my little project was a success anyway. And now, there ARE directions on the internet.

Here it goes!

The Ingredients:


I like Red Hots, but your favorite cinnamon candy will do just fine. I also threw in a few Chewy Atomic Fireballs for funsies.

Jack Daniels is my whiskey of choice. Again, any will do. Be warned- crappy whiskey will make crappy Fireball Whiskey. This process doesn't mask the flavor, it just enhances it with an awesome sweet cinnamon finish.

To layer the flavors even further, check out that bad boy in the picture below. That's a cinnamon stick. Throw it in, shake it up, and let it steep for a day or two, but no more than that. It'll get a bit rank if you leave it too long.


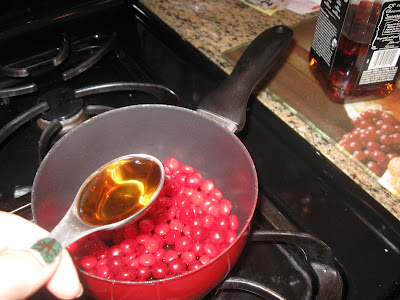
Toss about a cup of cinnamon candies into a saucepan. Add about 5 tablespoons of whiskey to the mix and turn on the heat to a low-medium. You don't want to burn your candy- more like a slow melt. I dilute it with whiskey instead of water so as not to dilute the drink, but if you want to tone down the strength of the whiskey water works too. Just don't melt the candies dry. The mess will be no bueno and you can kiss your cookware goodbye.


Yes, that's a tree on my thumb nail. Moving right along.

After a few minutes of constant stirring it'll look like this:


Much foam, a delicious invigorating smell, and complete opacity. If you notice it getting too sticky or thick, add more liquid. You don't want it to re-solidify.

When it gets to this point you should have pure liquid, no solid pieces. Note- if you used the Atomic Fireball Chewies I spoke of, they won't melt totally. You'll have to strain those out at the end. Then eat them because they're tasty and whiskey saturated.

Let it sit over low simmering heat until it starts getting glassy. Then pour in the rest of the whiskey TO THE POT. If you don't put it on over the heat it won't combine properly. Don't heat it too long- just a couple minutes to stir it together. Because as we know, heat makes the alcohol go away. :( You can use whatever whiskey to candy syrup ratio you like. I used equal parts of each to delicious results, but feel free to experiment and comment with your results!

Enjoy, and remember to be safe.

Saturday, August 27, 2011

Puh-Lease Hurricane Irene. No One Gets Between Me And Caffeine.

With this hurricane, tornado, and earthquake business going on in Jersey the past few days, electricity's been pretty shaky. My main concern? HOW WILL I BREW MY COFFEE?

I'm actually not too concerned though. Not because I am able to do without coffee for a few days. No sir. I'm not concerned because I spend my summers making jar after jar of cold brew coffee.

While not all of you are in the middle of an electricity crisis due to Hurricane Irene, cold brew is an entirely different coffee experience and you should really try it regardless of your fancy schmancy coffee brewing devices. Here are the primary coffee brewing devices in my arsenal of caffeinery during the Jersey Shore summer:


Yup. It's pretty high end stuff.
 Though I AM loving that cute little measuring cup I got at Pier1.

Here's how to make yourself some cold brew.
FIRST OFF. Let me make it known that what you are making is a CONCENTRATE. So it needs to be diluted with a large proportion of milk unless you like triple strength coffee, in which case, knock yourself out, and God bless your soul.

I like to use 1 cup of coffee grounds for every 2.5-3 cups of water. But this is really up to you and how strong or weak you want it to be. I played around with it for a while and this is the best I came up with, at least for how I liked to mix up my iced coffee in the end. More of that later though.

Ready? Put the grounds in your jar.

 I used a paper towel rolled into a funnel shape to get the grounds in the jar easily but its up to you. Someone with normal amounts of hand eye coordination can probably do without that.

Add water and shake it up good.

 I like to do a little jig while I'm shaking it. This is not necessary to the process, but I think you should do it anyway.

Let it sit for about 10-12 hours. Using a coffee strainer of some sort, strain the coffee into another jar or container.

I have a 4cup coffee maker with one of those reusable washable filters inside so I put that on top of a cup with the right sized opening and let it sit, refilling the filter as it drains and empties. But paper filters will definitely do. That's how I did it before I remembered I had an easier option staring me in the face.

Mix up your coffee drink! Use about 4 ounces of coffee and then add about 6 ounces of milk. If it licks your lizard you can add some sugar and a splash of cream as well! I'm satisfied with skim milk and coffee myself.

Easy right? Yet delicious. Easy and delicious. My favorite! n_n

As a side note- I use whole bean coffee that I grind myself in my cute little Cuisinart grinder right before brewing of any sort. IT IS SO GOOD. Best 30$ investment of my entire life. I was completely shocked after having a friend make me coffee this way at how pure and downright good it tasted. How could I love coffee so much and not grind my own? For shame.

Hey Man, Check Out My Sweet New Blog!

The infamously needy HappyBurger, my trusty sidekick.
I love to read blogs. Love it. I decided late last night, as my eyes began to burn and the clever words of my favorite bloggers began to blur on the screen, that it was time for me to join the community. And here we are! In the throes of Hurricane Irene, I am cozied up on my couch, with my faithful pooch and a cup of hibiscus tea, beginning what I'm sure will become a daily habit. The question remains- what will I blog about? I could have contemplated that as I lay awake at 4am last night listening to She and Him, but my delusional late-night thoughts really were not where I wanted to begin this little project. Instead, I'm deciding right now, as my old man pup Happy paws at my keyboard, that I will see what manifests and roll with it. Why not? I don't believe in planning. That's my mother's forte. This nut fell miles away from the tree my friends. Enjoy!